Writing Evaluation Script

Writing an Evaluation Script

Each challenge has an evaluation script, which evaluates the submission of participants and returns the scores which will populate the leaderboard. The logic for evaluating and judging a submission is customizable and varies from challenge to challenge, but the overall structure of evaluation scripts are fixed due to architectural reasons.

Evaluation scripts are required to have an evaluate() function. This is the main function, which is used by workers to evaluate the submission messages.

The syntax of evaluate function is:

def evaluate(test_annotation_file, user_annotation_file, phase_codename, **kwargs):
    pass

It receives three arguments, namely:

  • test_annotation_file: It represents the local path to the annotation file for the challenge. This is the file uploaded by the Challenge host while creating a challenge.
  • user_annotation_file: It represents the local path of the file submitted by the user for a particular challenge phase.
  • phase_codename: It is the codename of the challenge phase from the challenge configuration yaml. This is passed as an argument so that the script can take actions according to the challenge phase.

After reading the files, some custom actions can be performed. This varies per challenge.

The evaluate() method also accepts keyword arguments. By default, we provide you metadata of each submission to your challenge which you can use to send notifications to your slack channel or to some other webhook service. Following is an example code showing how to get the submission metadata in your evaluation script and send a slack notification if the accuracy is more than some value X (X being 90 in the example given below).

def evaluate(test_annotation_file, user_annotation_file, phase_codename, **kwargs):

    submission_metadata = kwargs.get("submission_metadata")
    print submission_metadata

    # Do stuff here
    # Set `score` to 91 as an example

    score = 91
    if score > 90:
        slack_data = kwargs.get("submission_metadata")
        webhook_url = "Your slack webhook url comes here"
        # To know more about slack webhook, checkout this link: https://api.slack.com/incoming-webhooks

        response = requests.post(
            webhook_url,
            data=json.dumps({'text': "*Flag raised for submission:* \n \n" + str(slack_data)}),
            headers={'Content-Type': 'application/json'})

    # Do more stuff here

The above example can be modified and used to find if some participant team is cheating or not. There are many more ways for which you can use this metadata.

After all the processing is done, this evaluate() should return an output, which is used to populate the leaderboard. The output should be in the following format:

output = {}
output['result'] = [
            {
                'train_split': {
                    'Metric1': 123,
                    'Metric2': 123,
                    'Metric3': 123,
                    'Total': 123,
                }
            },
            {
                'test_split': {
                    'Metric1': 123,
                    'Metric2': 123,
                    'Metric3': 123,
                    'Total': 123,
                }
            }
        ]

return output

Let’s break down what is happening in the above code snippet.

  1. output should contain a key named result, which is a list containing entries per dataset split that is available for the challenge phase in consideration (in the function definition of evaluate() shown above, the argument: phase_codename will receive the codename for the challenge phase against which the submission was made).
  2. Each entry in the list should be a dict that has a key with the corresponding dataset split codename (train_split and test_split for this example).
  3. Each of these dataset split dict contains various keys (Metric1, Metric2, Metric3, Total in this example), which are then displayed as columns in the leaderboard.

Writing Code-Upload Challenge Evaluation

Each challenge has an evaluation script, which evaluates the submission of participants and returns the scores which will populate the leaderboard. The logic for evaluating and judging a submission is customizable and varies from challenge to challenge, but the overall structure of evaluation scripts is fixed due to architectural reasons.

In code-upload challenges, the evaluation is tighly-coupled with the agent and environment containers:

  1. The agent interacts with environment via actions and provides a ‘stop’ signal when finished.
  2. The environment provides feedback to the agent until ‘stop’ signal is received, episodes run out or the time limit is over.

The starter templates for code-upload challenge evaluation can be found here.

The steps to configure evaluation for code-upload challenges are:

  1. Create an environment: There are few steps involved in creating an environment:

    1. Edit the evaluator_environment: This class defines the environment (a gym environment or a habitat environment) and other related attributes/methods. Modify the evaluator_environment containing a gym environment shown here:

      class evaluator_environment:
          def __init__(self, environment="CartPole-v0"):
              self.score = 0
              self.feedback = None
              self.env = gym.make(environment)
              self.env.reset()
      
          def get_action_space(self):
              return list(range(self.env.action_space.n))
      
          def next_score(self):
              self.score += 1
      

      There are three methods in this example:

      • __init__: The initialization method to instantiate and set up the evaluation environment.
      • get_action_space: Returns the action space of the agent in the environment.
      • next_score: Returns/updates the reward achieved.

      You can add custom methods and attributes which help in interaction with the environment.

    2. Edit the Environment service: This service is hosted on the gRPC server to get actions in form of messages from the agent container. Modify the lines shown here:

      class Environment(evaluation_pb2_grpc.EnvironmentServicer):
          def __init__(self, challenge_pk, phase_pk, submission_pk, server):
              self.challenge_pk = challenge_pk
              self.phase_pk = phase_pk
              self.submission_pk = submission_pk
              self.server = server
      
          def get_action_space(self, request, context):
              message = pack_for_grpc(env.get_action_space())
              return evaluation_pb2.Package(SerializedEntity=message)
      
          def act_on_environment(self, request, context):
              global EVALUATION_COMPLETED
              if not env.feedback or not env.feedback[2]:
                  action = unpack_for_grpc(request.SerializedEntity)
                  env.next_score()
                  env.feedback = env.env.step(action)
              if env.feedback[2]:
                  if not LOCAL_EVALUATION:
                      update_submission_result(
                          env, self.challenge_pk, self.phase_pk, self.submission_pk
                      )
                  else:
                      print("Final Score: {0}".format(env.score))
                      print("Stopping Evaluation!")
                      EVALUATION_COMPLETED = True
              return evaluation_pb2.Package(
                  SerializedEntity=pack_for_grpc(
                      {"feedback": env.feedback, "current_score": env.score,}
                  )
              )
      

      You can modify the relevant parts of the environment service in order to make it work for your case. You would need to serialize and deserialize the response/request to pass messages between the agent and environment over gRPC. For this, we have implemented two methods which might be useful:

      • unpack_for_grpc: This method deserializes entities from request/response sent over gRPC. This is useful for receiving messages (for example, actions from the agent).
      • pack_for_grpc: This method serializes entities to be sent over a request over gRPC. This is useful for sending messages (for example, feedback from the environment).

      Note: This is a basic description of the class and the implementations may vary on a case-by-case basis.

    3. Edit the requirements file: Change the requirements file according to the packages required by your environment.

    4. Edit environment Dockerfile: You may choose to modify the Dockerfile that will set up and run the environment service.

    5. Edit the docker environment variables: Fill in the following information in the docker.env file:

      AUTH_TOKEN=<Add your EvalAI Auth Token here>
      EVALAI_API_SERVER=<https://eval.ai>
      LOCAL_EVALUATION = True
      QUEUE_NAME=<Go to the challenge manage tab to get challenge queue name.>
      
    6. Create the docker image and upload on ECR: Create an environment docker image for the created Dockerfile by using:

      docker build -f <file_path_to_Dockerfile>
      

      Upload the created docker image to ECR:

      aws ecr get-login-password --region <region> | docker login --username AWS --password-stdin <aws_account_id>.dkr.ecr.<region>.amazonaws.com
      docker tag <image_id> <aws_account_id>.dkr.ecr.<region>.amazonaws.com/<my-repository>:<tag>
      docker push <aws_account_id>.dkr.ecr.<region>.amazonaws.com/<my-repository>:<tag>
      

      Detailed steps for uploading a docker image to ECR can be found here.

    7. Add environment image the challenge configuration for challenge phase: For each challenge phase, add the link to the environment image in the challenge configuration:

      ...
      challenge_phases:
          - id: 1
          ...
          - environment_image: <docker image uri>
      ...
      

    Example References:

    • Habitat Benchmark: This file contains description of an evaluation class which evaluates agents on the environment.
  2. Create a starter example: The participants are expected to submit docker images for their agents which will contain the policy and the methods to interact with the environment.

    Like environment, there are a few steps involved in creating the agent:

    1. Create a starter example script: Please create a starter agent submission and a local evaluation script in order to help the participants perform sanity checks on their code before making submissions to EvalAI.

      The agent.py file should contain a description of the agent, the methods that the environment expects the agent to have, and a main() function to pass actions to the environment.

      We provide a template for agent.py here:

      import evaluation_pb2
      import evaluation_pb2_grpc
      import grpc
      import os
      import pickle
      import time
      
      time.sleep(30)
      
      LOCAL_EVALUATION = os.environ.get("LOCAL_EVALUATION")
      
      if LOCAL_EVALUATION:
          channel = grpc.insecure_channel("environment:8085")
      else:
          channel = grpc.insecure_channel("localhost:8085")
      
      stub = evaluation_pb2_grpc.EnvironmentStub(channel)
      
      def pack_for_grpc(entity):
          return pickle.dumps(entity)
      
      def unpack_for_grpc(entity):
          return pickle.loads(entity)
      
      flag = None
      
      while not flag:
          base = unpack_for_grpc(
              stub.act_on_environment(
                  evaluation_pb2.Package(SerializedEntity=pack_for_grpc(1))
              ).SerializedEntity
          )
          flag = base["feedback"][2]
          print("Agent Feedback", base["feedback"])
          print("*"* 100)
      

      Other Examples: - A random agent from Habitat Rearrangement Challenge 2022

    2. Edit the requirements file: Change the requirements file according to the packages required by an agent.

    3. Edit environment Dockerfile: You may choose to modify the Dockerfile which will run the agent.py file and interact with environment.

    4. Edit the docker environment variables: Fill in the following information in the docker.env file:

      LOCAL_EVALUATION = True
      

    Example References:

Writing Remote Evaluation Script

Each challenge has an evaluation script, which evaluates the submission of participants and returns the scores which will populate the leaderboard. The logic for evaluating and judging a submission is customizable and varies from challenge to challenge, but the overall structure of evaluation scripts is fixed due to architectural reasons.

The starter template for remote challenge evaluation can be found here.

Here are the steps to configure remote evaluation:

  1. Setup Configs:

    To configure authentication for the challenge set the following environment variables:

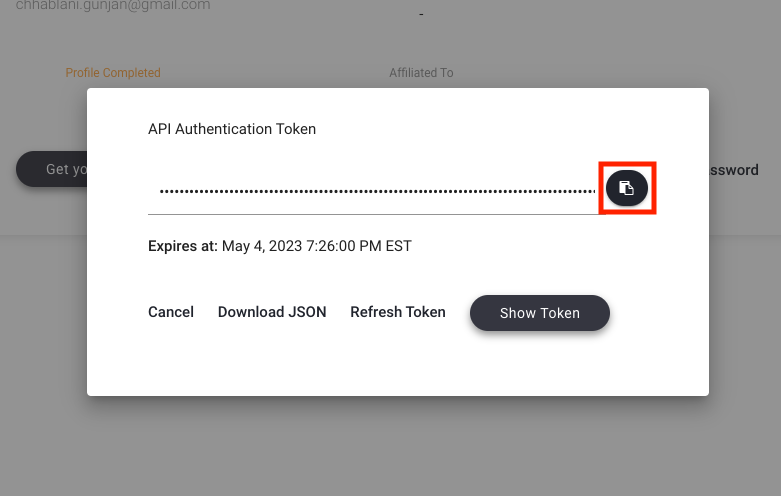
    1. AUTH_TOKEN: Go to profile page -> Click on Get your Auth Token -> Click on the Copy button. The auth token will get copied to your clipboard.
    2. API_SERVER: Use https://eval.ai when setting up challenge on production server. Otherwise, use https://staging.eval.ai

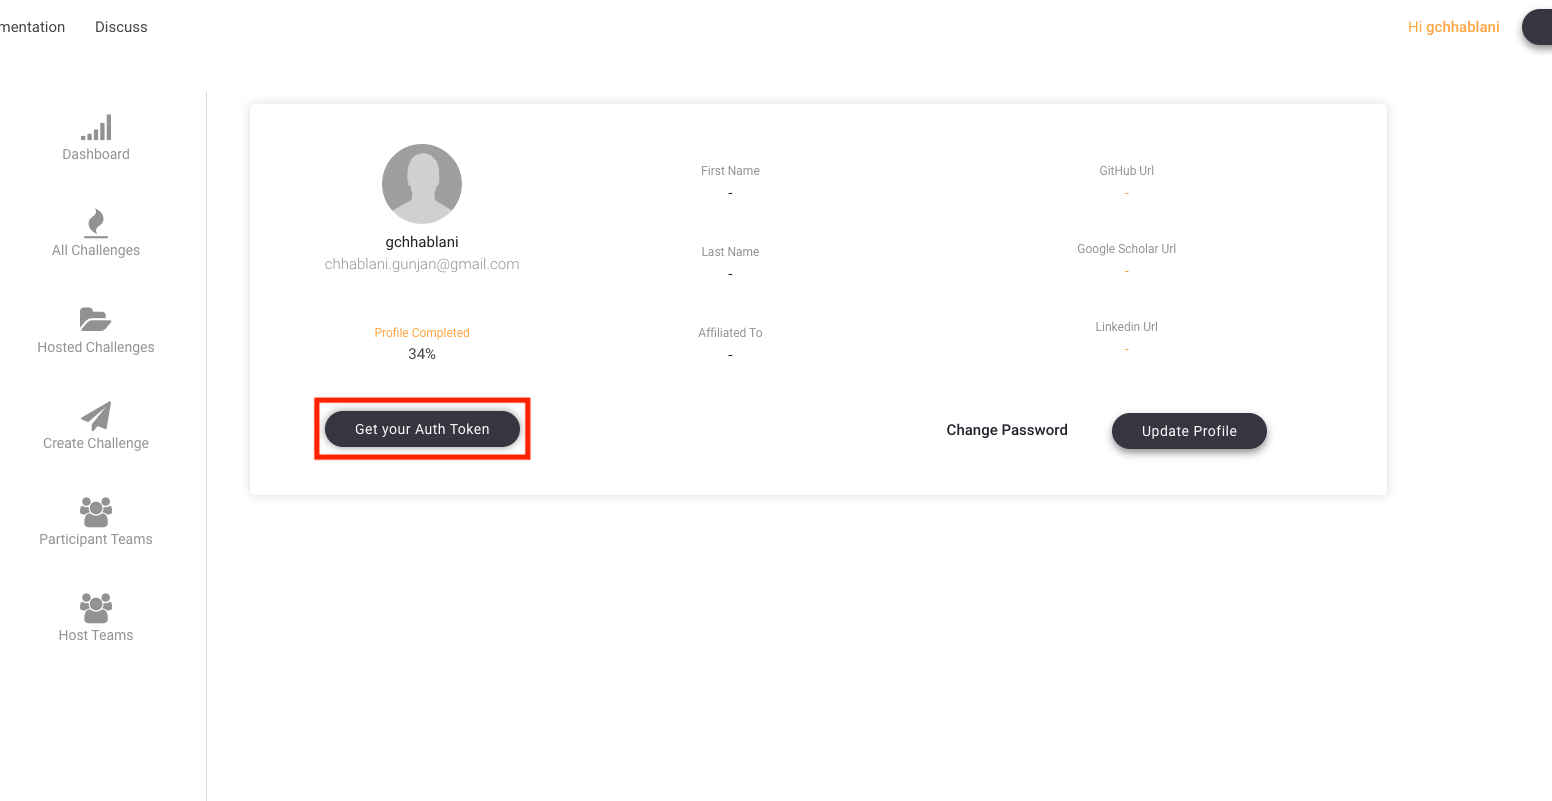
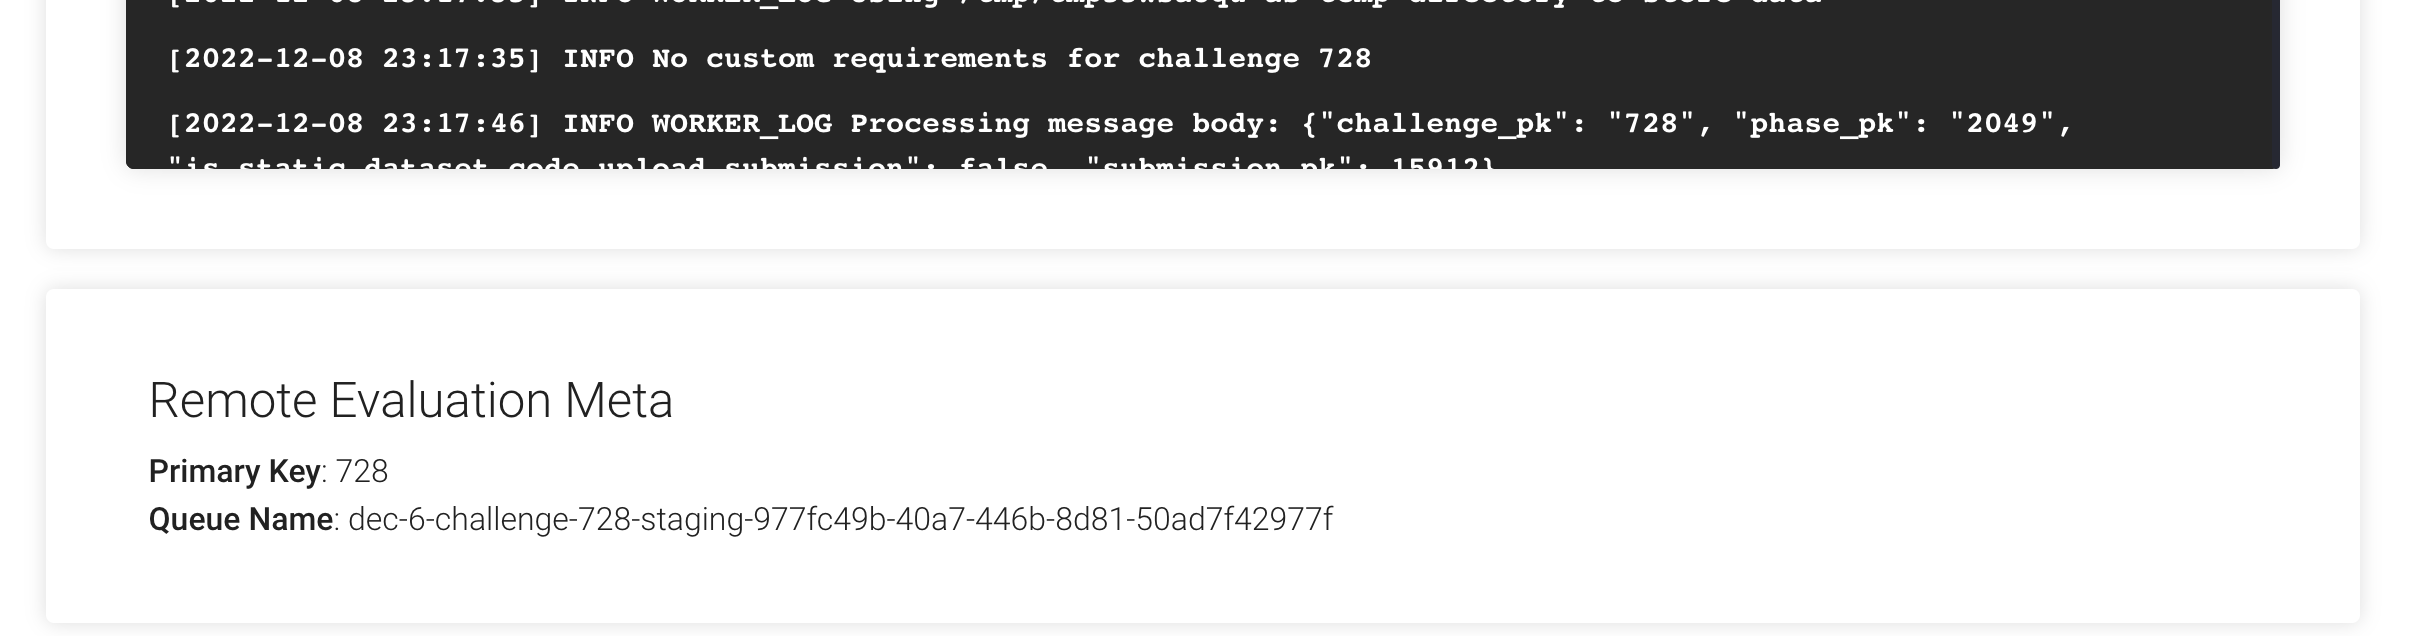
    3. QUEUE_NAME: Go to the challenge manage tab to fetch the challenge queue name.
    4. CHALLENGE_PK: Go to the challenge manage tab to fetch the challenge primary key.
    5. SAVE_DIR: (Optional) Path to submission data download location.
  2. Write evaluate method: Evaluation scripts are required to have an evaluate() function. This is the main function, which is used by workers to evaluate the submission messages.

    The syntax of evaluate function for a remote challenge is:

    def evaluate(user_submission_file, phase_codename, test_annotation_file = None, **kwargs)
        pass
    

    It receives three arguments, namely:

    • user_annotation_file: It represents the local path of the file submitted by the user for a particular challenge phase.
    • phase_codename: It is the codename of the challenge phase from the challenge configuration yaml. This is passed as an argument so that the script can take actions according to the challenge phase.
    • test_annotation_file: It represents the local path to the annotation file for the challenge. This is the file uploaded by the Challenge host while creating a challenge.

    You may pass the test_annotation_file as default argument or choose to pass separately in the main.py depending on the case. The phase_codename is passed automatically but is left as an argument to allow customization.

    After reading the files, some custom actions can be performed. This varies per challenge.

    The evaluate() method also accepts keyword arguments.

    IMPORTANT ⚠️: If the evaluate() method fails due to any reason or there is a problem with the submission, please ensure to raise an Exception with an appropriate message.

Writing Static Code-Upload Challenge Evaluation Script

Each challenge has an evaluation script, which evaluates the submission of participants and returns the scores which will populate the leaderboard. The logic for evaluating and judging a submission is customizable and varies from challenge to challenge, but the overall structure of evaluation scripts are fixed due to architectural reasons.

The starter templates for static code-upload challenge evaluation can be found here. Note that the evaluation file provided will be used on our submission workers, just like prediction upload challenges.

The steps for writing an evaluation script for a static code-upload based challenge are the same as that for [prediction-upload based challenges] section (evaluation_scripts.html#writing-an-evaluation-script).

Evaluation scripts are required to have an evaluate() function. This is the main function, which is used by workers to evaluate the submission messages.

The syntax of evaluate function is:

def evaluate(test_annotation_file, user_annotation_file, phase_codename, **kwargs):
    pass

It receives three arguments, namely:

  • test_annotation_file: It represents the local path to the annotation file for the challenge. This is the file uploaded by the Challenge host while creating a challenge.
  • user_annotation_file: It represents the local path of the file submitted by the user for a particular challenge phase.
  • phase_codename: It is the codename of the challenge phase from the challenge configuration yaml. This is passed as an argument so that the script can take actions according to the challenge phase.

After reading the files, some custom actions can be performed. This varies per challenge.

The evaluate() method also accepts keyword arguments. By default, we provide you metadata of each submission to your challenge which you can use to send notifications to your slack channel or to some other webhook service. Following is an example code showing how to get the submission metadata in your evaluation script and send a slack notification if the accuracy is more than some value X (X being 90 in the example given below).

def evaluate(test_annotation_file, user_annotation_file, phase_codename, **kwargs):

    submission_metadata = kwargs.get("submission_metadata")
    print submission_metadata

    # Do stuff here
    # Set `score` to 91 as an example

    score = 91
    if score > 90:
        slack_data = kwargs.get("submission_metadata")
        webhook_url = "Your slack webhook url comes here"
        # To know more about slack webhook, checkout this link: https://api.slack.com/incoming-webhooks

        response = requests.post(
            webhook_url,
            data=json.dumps({'text': "*Flag raised for submission:* \n \n" + str(slack_data)}),
            headers={'Content-Type': 'application/json'})

    # Do more stuff here

The above example can be modified and used to find if some participant team is cheating or not. There are many more ways for which you can use this metadata.

After all the processing is done, this evaluate() should return an output, which is used to populate the leaderboard. The output should be in the following format:

output = {}
output['result'] = [
            {
                'train_split': {
                    'Metric1': 123,
                    'Metric2': 123,
                    'Metric3': 123,
                    'Total': 123,
                }
            },
            {
                'test_split': {
                    'Metric1': 123,
                    'Metric2': 123,
                    'Metric3': 123,
                    'Total': 123,
                }
            }
        ]

return output

Let’s break down what is happening in the above code snippet.

  1. output should contain a key named result, which is a list containing entries per dataset split that is available for the challenge phase in consideration (in the function definition of evaluate() shown above, the argument: phase_codename will receive the codename for the challenge phase against which the submission was made).
  2. Each entry in the list should be a dict that has a key with the corresponding dataset split codename (train_split and test_split for this example).
  3. Each of these dataset split dict contains various keys (Metric1, Metric2, Metric3, Total in this example), which are then displayed as columns in the leaderboard.

A good example of a well-documented evaluation script for static code-upload challenges is My Seizure Gauge Forecasting Challenge 2022.